View Categories

Bitwarden – Importing Data from Popular Solutions

28 min read

Import Data from LastPass #

Use this article for help exporting data from LastPass and importing into Bitwarden.

Import to Bitwarden #

Data can be imported directly from LastPass or using an exported file from LastPass. If you’re a member of a team using SSO with LastPass, a LastPass administrator will need to complete a short setup procedure before you can use the Direct import option to import your personal data. In all cases, data is encrypted locally before being sent to the server for storage.

Direct Import #

Tip

If you’re a member of a team using SSO with LastPass, a LastPass administrator will need to complete a short setup procedure before you can use the Direct import option.

Password Manager browser extensions and desktop apps can import individual vault data directly from your LastPass account, without requiring you to upload a file. To do a direct import:

  1. Log in to the Password Manager browser extension or desktop app.
  2. In the browser extension, select the Settings tab and choose the Import items option. Or, in the desktop app, select File Import data.
  3. Complete the following fields from the drop down menus:
    • Import destination: Select the import destination such as your individual vault or an organizational vault that you have access to.
    • Folder or Collection: Select if you would like the imported content moved to a specific folder or organization collection that you have access to.
    • File format: Select LastPass.
    • In the LastPass Instructions box, choose the Import directly from LastPass option.
    • Enter your LastPass email. If you’re importing on behalf of your business, we recommend using the credentials of a LastPass admin. Using super admin credentials may cause import to fail.
  4. Select the Import data button to trigger the import.
  5. You will be prompted for your LastPass master password or, if your LastPass account uses SSO, to log in to your IdP. In either case, follow the prompts to log in to your LastPass account.

    Tip

    If your LastPass account has multi-factor authentication activated, you will be prompted to enter a one-time passcode from your authenticator app. If you use Duo for MFA, only in-app approval is supported to fulfill your MFA requirement.

Additional items such as file attachments and trash will need to be manually uploaded to your vault. #

File Import #

Files can be imported to Bitwarden from most Password Manager apps. In this section, we’ll focus on importing using the web app:

  1. Log in to the web vault at https://vault.bitwarden.comhttps://vault.bitwarden.eu, or https://your.bitwarden.domain.com if self-hosting.
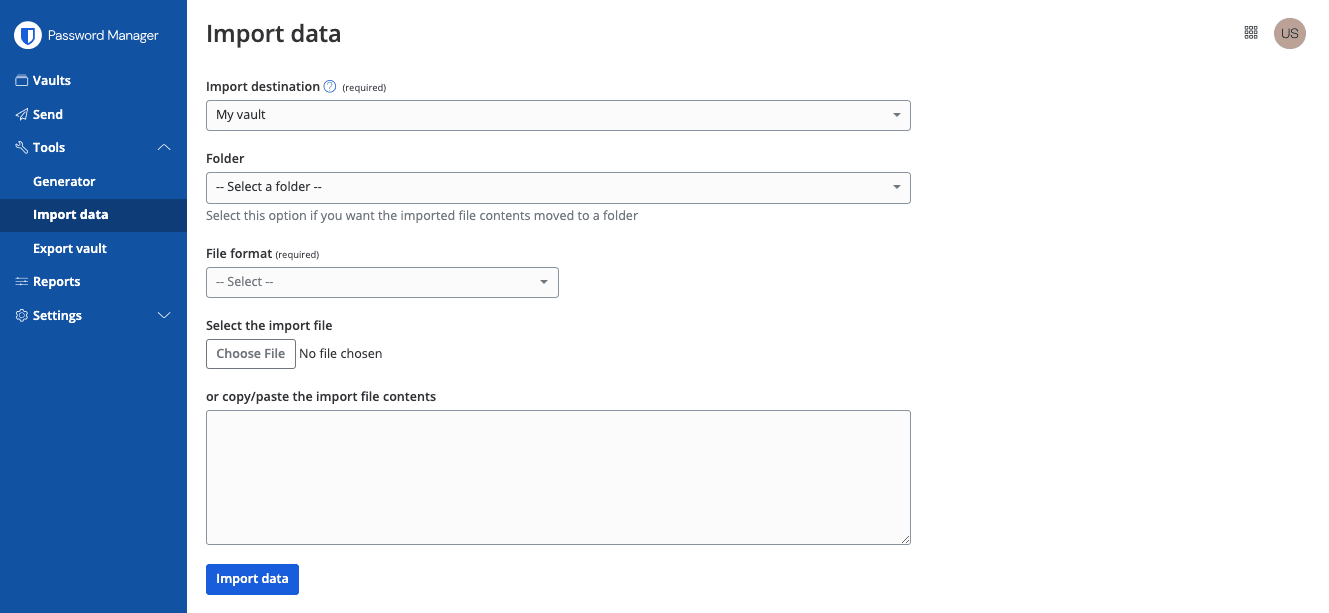
  2. Select Tools → Import data from the navigation:
  3. Complete the following fields from the drop down menus:
    • Import destination: Select the import destination such as your individual vault or an organizational vault that you have access to.
    • Folder or Collection: Select if you would like the imported content moved to a specific folder or organization collection that you have access to.
    • File format: Select the import file format.
  4. Select Choose File and add the file to import or copy/paste the contents of your file into the input box.

    Warning

    Importing does not check whether items in the file to import already exist in your vault. If you import multiple files or import files with items already in your vault, this will create duplicates.
  5. Select Import data to trigger the import. If you are importing a password protected .json file, enter the password into the Confirm vault import window that will appear.
  6. After successful import, delete the import source file from your computer. This will protect you in the event your computer is compromised.

Additional items such as file attachments, and trash will need to be manually uploaded to your vault. #

CLI #

To import data to your vault from the CLI, use the following command:

bw import <format> <path>

bw import requires a format (use bw import --formats to retrieve a list of formats) and a path, for example:

bw import <format> /Users/myaccount/Documents/mydata.csv

After successful import, delete the import source file from your computer. This will protect you in the event your computer is compromised.

Export from LastPass #

You can export your data from LastPass from their web vault or from a LastPass browser extension:

Last Pass Web Vault #

To export your data from the LastPass web vault:

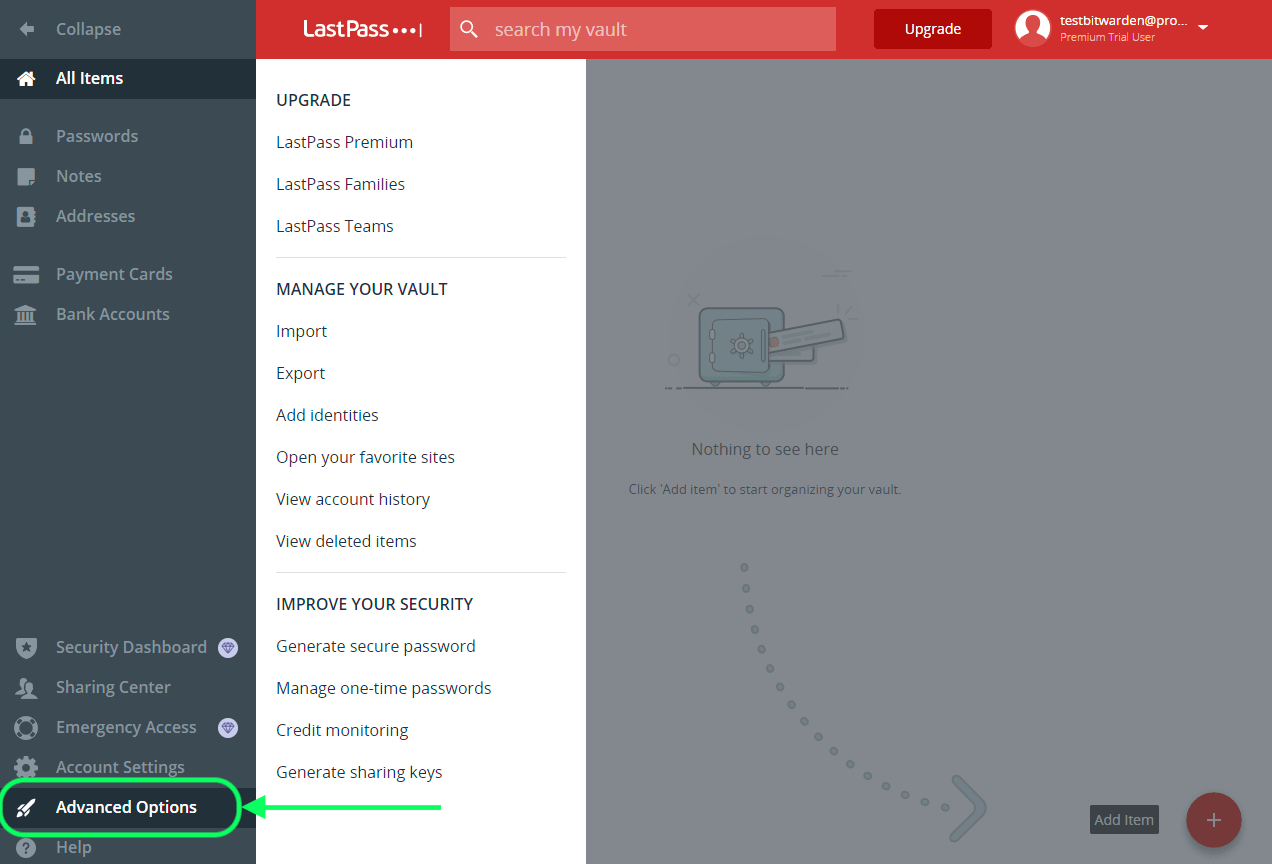
  1. Select the Advanced Options option on the left sidebar:
  2. From the Manage your Vault section, select the Export option. At this stage, LastPass will send you an email to confirm the export.
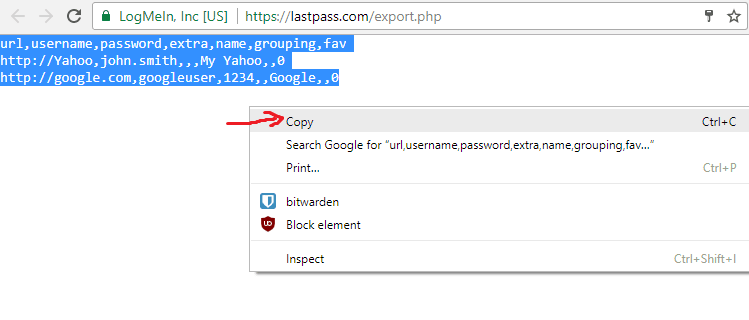
  3. In your inbox, confirm the export, return to your LastPass web vault, and select the Export option again to complete export. Depending on your browser, your data will either be automatically saved as a .csv or printed to the screen in a .csv format:
  4. If your data was printed to the screen, highlight the text and copy and paste it into a new export.csv file.

Warning

Some users have reported a bug which changes special characters in your passwords (&<>, and so on) to their HTML-encoded values (for example, &amp;) in the printed export. If you observe this bug in your exported data, use a text editor to find and replace all altered values before importing into Bitwarden.

LastPass Browser Extension #

To export your data from a LastPass browser extension:

  1. In the browser extension, navigate to Account → Fix a problem yourself → Export vault items → Export data for use anywhere.

    Note

    If you’re using an old version of the LastPass browser extension, you may instead need to navigate to Account Options → Advanced → Export → LastPass CSV File.
  2. Enter your master password to validate the export attempt. Depending on your browser, your data will either be automatically saved as a .csv or printed to the screen in a .csv format:
  3. If your data was printed to the screen, highlight the text and copy and paste it into a new export.csv file.

Direct import with SSO #

Warning

The following IdPs are not supported for direct import by LastPass accounts using SSO:

  • Google Workspace
  • ADFS

If you’re an administrator of a team using SSO with LastPass, you will need to complete the following before your team can use the Direct import option:

  • Add bitwarden://sso-callback-lp and bitwarden://import-callback-lp as permitted callback URLs in your IdP’s LastPass application.

If your users will use the Password Manager browser extension, add:

  • Add https://vault.bitwarden.com/sso-connector.html?lp=1, https://vault.bitwarden.eu/sso-connector.html?lp=1, or https://your.server.com/sso-connector.html?lp=1 as a permitted callback URL in your IdP’s LastPass application.
  • Add chrome-extension://nngceckbapebfimnlniiiahkandclblbms-browser-extension://jbkfoedolllekgbhcbcoahefnbanhhlh, and/or moz-extension://23462205-0e62-4cc8-80c4-910cf54b82c2 as a permitted callback URL in your IdP’s LastPass application.

Import troubleshooting #

File size import limitations #

Imports may be rejected for exceeding any of the following data limitations:

  • If your import has more than 7,000 items.
  • If your import has more than 2,000 folders.
  • If your import has more than 2,000 collections.
  • If your import has more than 7,000 item-folder relationships (e.g. a single item in 3 folders can be said to have 3 item-folder relationships).
  • If your import has more than 14,000 item-collection relationships (e.g. a single item in 3 collections can be said to have 3 item-collection relationships).

Field size import errors #

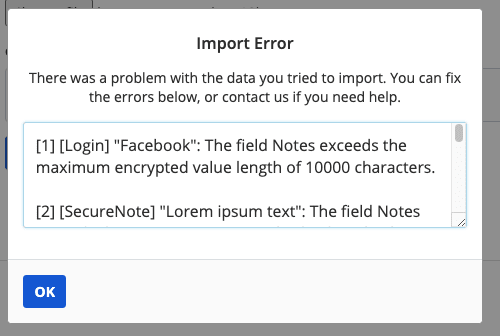
The following error messages, typically received when attempting to import a .csv, indicate that an item in your import file has a specified value that exceeds the allowed encrypted character limit for its field type:

To solve this issue, open the .csv file in a text editor or spreadsheet program and remove or reduce the character count of the offending item. Bitwarden won’t import your .csv file until it is free of offenses. The contents of the error messages contain several pieces of pertinent data to help you identify the offending item. For example, in the above example:

  • [1] identifies the index number where the offending item is located, adjusted to match row numbering in most spreadsheet programs.
  • [Login] identifies the vault item type of the offending item.
  • "Facebook" identifies the name of the offending item.
  • Notes indicates the field (column) where the character limit is exceeded.
  • 10000 indicates the character limit allowed for that field (column).

    Tip

    On import to Bitwarden, the character count of any given field is increased due to encryption, meaning that an 8000-character Notes field in your .csv will scale to 10,000+ characters when it comes into contact with Bitwarden, triggering this error. As a rule of thumb, character counts will grow between 30-50% when encrypted.

If you continue to have trouble locating the offending item using the data provided in the error, it may help to focus first on notes as these are frequently the cause of this error.

Maximum collections error #

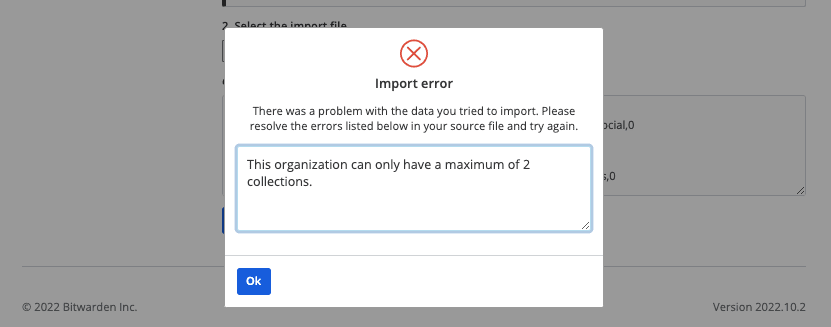
When importing Lastpass .csv exports to a free organization, you may observe the following error:

This error occurs when the LastPass export contains three or more grouping values. The values in the grouping field are interpreted by Bitwarden as collections, however free organizations are limited to only two collections. The following .csv, for example, would cause this error:

url,username,password,totp,extra,name,grouping,fav
https://www.facebook.com/login.php,username,password,,,Facebook,Social,0
https://twitter.com/login,username,password,,,Twitter,Social,0
https://asana.com/,login,password,,,Asana,Productivity Tools,0
https://github.com/login,username,password,,,Github,Productivity Tools,0
https://www.paypal.com/login,username,password,,,Paypal,Finance,0
https://www.bankofamerica.com/,username,password,,,Bankofamerica,Finance,0

To solve this issue, delete the grouping column and the grouping datum for each item, including the trailing comma, for example edit:

https://github.com/login,username,password,,,Github,Productivity Tools,0

down to:

https://github.com/login,username,password,,,Github,0

Import Data from 1Password #

Use this article for help exporting data from 1Password and importing into Bitwarden. 1Password data exports are available as .1pux (requires 1Password v8.5+), .1pif, and .csv files depending on which client version and operating system you are using.

Export from 1Password #

Complete the following steps to export data from the 1Password desktop app:

Tip

Currently, only 1Password 8 allows you to export multiple vaults at once. If you are using 1Password 8, skip to Step 3.
  1. Navigate to the vault you’d like to export.
  2. In your vault, select the items you would like to export. Hold Ctrl/Cmd to select multiple vault items, or select everything by pressing Ctrl/Cmd + A.
  3. On Windows, select File → Export or right-click and select Export.On macOS, select File → Export → All Items...
  4. In the export window, specify a location and file format.

    Note

    If you are exporting a .csv from macOS, you must also select the All Fields radio button and check the Include Column Labels checkbox.

Import to Bitwarden #

Data must be imported to Bitwarden from the web vault or CLI. Data is encrypted locally before being sent to the server for storage.

Web App #

To import data to your vault:

  1. Log in to the web vault at https://vault.bitwarden.comhttps://vault.bitwarden.eu, or https://your.bitwarden.domain.com if self-hosting.
  2. Select Tools → Import data from the navigation:
  3. Complete the following fields from the drop down menus:
    • Import destination: Select the import destination such as your individual vault or an organizational vault that you have access to.
    • Folder or Collection: Select if you would like the imported content moved to a specific folder or organization collection that you have access to.
    • File format: Select the import file format.
  4. Select Choose File and add the file to import or copy/paste the contents of your file into the input box.

    Warning

    Importing does not check whether items in the file to import already exist in your vault. If you import multiple files or import files with items already in your vault, this will create duplicates.
  5. Select Import data to trigger the import. If you are importing a password protected .json file, enter the password into the Confirm vault import window that will appear.
  6. After successful import, delete the import source file from your computer. This will protect you in the event your computer is compromised.

Additional items such as file attachmentsSends, and trash will need to be manually uploaded to your vault.

Browser Extension #

To import data to your vault:

  1. Select the Settings tab and choose the Import items option.
  2. Complete the following fields from the drop down menus:
    1. Import destination: Select the import destination such as your individual vault or an organizational vault that you have access to.
    2. Folder or Collection: Select if you would like the imported content moved to a specific folder or organization collection that you have access to.
    3. File format: Select the import file format.
  3. Select Choose File and add the file to import or copy/paste the contents of your file into the input box.

    Warning

    Importing does not check whether items in the file to import already exist in your vault. If you import multiple files or import files with items already in your vault, this will create duplicates.
  4. Select Import Data to trigger the import. If you are importing a password protected .json file, enter the password into the Confirm Vault Import window that will appear.
  5. After successful import, delete the import source file from your computer. This will protect you in the event your computer is compromised.

Desktop App #

To import data to your vault:

  1. Select File Import data.
  2. Complete the following fields from the drop down menus:
    1. Import destination: Select the import destination such as your individual vault or an organizational vault that you have access to.
    2. Folder or Collection: Select if you would like the imported content moved to a specific folder or organization collection that you have access to.
    3. File format: Select the import file format.
  3. Select Choose File and add the file to import or copy/paste the contents of your file into the input box.

    Warning

    Importing does not check whether items in the file to import already exist in your vault. If you import multiple files or import files with items already in your vault, this will create duplicates.
  4. Select Import Data to trigger the import. If you are importing a password protected .json file, enter the password into the Confirm Vault Import window that will appear.
  5. After successful import, delete the import source file from your computer. This will protect you in the event your computer is compromised.

CLI #

To import data to your vault from the CLI, use the following command:

bw import <format> <path>

bw import requires a format (use bw import --formats to retrieve a list of formats) and a path, for example:

bw import <format> /Users/myaccount/Documents/mydata.csv

After successful import, delete the import source file from your computer. This will protect you in the event your computer is compromised.

Import troubleshooting #

File size import limitations #

Imports may be rejected for exceeding any of the following data limitations:

  • If your import has more than 7,000 items.
  • If your import has more than 2,000 folders.
  • If your import has more than 2,000 collections.
  • If your import has more than 7,000 item-folder relationships (e.g. a single item in 3 folders can be said to have 3 item-folder relationships).
  • If your import has more than 14,000 item-collection relationships (e.g. a single item in 3 collections can be said to have 3 item-collection relationships).

Import Data from Firefox #

Use this article for help exporting data from Firefox and importing into Bitwarden.

Export from Firefox #

Exporting from Firefox can look a little different depending on which version you are using, or if you are using a Firefox-based browser like Tor Browser or Waterfox:

Latest Version #

To export logins from the latest version of Firefox:

  1. Using the address bar, navigate to about:logins.
  2. Select the menu button from the top right and select Export Logins… from the dropdown menu.You will be prompted to specify a location to save your login export to.Firefox will export your logins as a .csv.

Older Versions #

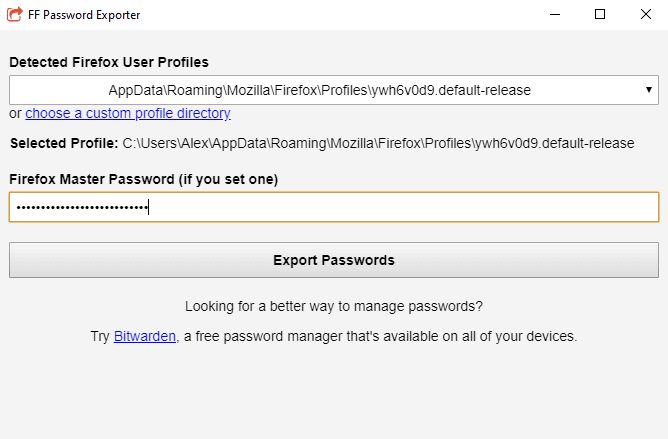
Some older versions of Firefox do not support native export. Complete the following steps to export using FF Password Exporter.

  1. Download, install, and open the FF Password Exporter.
  2. Select a user profile from the Detected Firefox User Profiles, or from a specified custom profile directory. If you have set a master password for the user profile, enter it:
  3. Select the Export Passwords button.
  4. Choose .csv for the file format, and save the file to your device.

Firefox-Based #

Some Firefox-based browsers offer login export in a different location than vanilla Firefox. If the steps to import from the Latest Version don’t work, try the following:

  1. Using the address bar, navigate to about:preferences#privacy.
  2. Click the Saved Logins button.
  3. Click the menu button from the top right and select Export Logins from the dropdown.You will be prompted to specify a location to save your login export.Most Firefox-based browsers will export your logins as a .csv.

Import to Bitwarden #

Data must be imported to Bitwarden from the web vault or CLI. Data is encrypted locally before being sent to the server for storage.

Web App #

To import data to your vault:

  1. Log in to the web vault at https://vault.bitwarden.comhttps://vault.bitwarden.eu, or https://your.bitwarden.domain.com if self-hosting.
  2. Select Tools → Import data from the navigation:
  3. Complete the following fields from the drop down menus:
    • Import destination: Select the import destination such as your individual vault or an organizational vault that you have access to.
    • Folder or Collection: Select if you would like the imported content moved to a specific folder or organization collection that you have access to.
    • File format: Select the import file format.
  4. Select Choose File and add the file to import or copy/paste the contents of your file into the input box.

    Warning

    Importing does not check whether items in the file to import already exist in your vault. If you import multiple files or import files with items already in your vault, this will create duplicates.
  5. Select Import data to trigger the import. If you are importing a password protected .json file, enter the password into the Confirm vault import window that will appear.
  6. After successful import, delete the import source file from your computer. This will protect you in the event your computer is compromised.

Additional items such as file attachmentsSends, and trash will need to be manually uploaded to your vault.

Browser Extension #

To import data to your vault:

  1. Select the Settings tab and choose the Import items option.
  2. Complete the following fields from the drop down menus:
    1. Import destination: Select the import destination such as your individual vault or an organizational vault that you have access to.
    2. Folder or Collection: Select if you would like the imported content moved to a specific folder or organization collection that you have access to.
    3. File format: Select the import file format.
  3. Select Choose File and add the file to import or copy/paste the contents of your file into the input box.

    Warning

    Importing does not check whether items in the file to import already exist in your vault. If you import multiple files or import files with items already in your vault, this will create duplicates.
  4. Select Import Data to trigger the import. If you are importing a password protected .json file, enter the password into the Confirm Vault Import window that will appear.
  5. After successful import, delete the import source file from your computer. This will protect you in the event your computer is compromised.

Desktop App #

To import data to your vault:

  1. Select File Import data.
  2. Complete the following fields from the drop down menus:
    1. Import destination: Select the import destination such as your individual vault or an organizational vault that you have access to.
    2. Folder or Collection: Select if you would like the imported content moved to a specific folder or organization collection that you have access to.
    3. File format: Select the import file format.
  3. Select Choose File and add the file to import or copy/paste the contents of your file into the input box.

    Warning

    Importing does not check whether items in the file to import already exist in your vault. If you import multiple files or import files with items already in your vault, this will create duplicates.
  4. Select Import Data to trigger the import. If you are importing a password protected .json file, enter the password into the Confirm Vault Import window that will appear.
  5. After successful import, delete the import source file from your computer. This will protect you in the event your computer is compromised.

CLI #

To import data to your vault from the CLI, use the following command:

bw import <format> <path>

bw import requires a format (use bw import --formats to retrieve a list of formats) and a path, for example:

bw import <format> /Users/myaccount/Documents/mydata.csv

After successful import, delete the import source file from your computer. This will protect you in the event your computer is compromised.

Import troubleshooting #

File size import limitations #

Imports may be rejected for exceeding any of the following data limitations:

  • If your import has more than 7,000 items.
  • If your import has more than 2,000 folders.
  • If your import has more than 2,000 collections.
  • If your import has more than 7,000 item-folder relationships (e.g. a single item in 3 folders can be said to have 3 item-folder relationships).
  • If your import has more than 14,000 item-collection relationships (e.g. a single item in 3 collections can be said to have 3 item-collection relationships).

Import Data from Google Chrome #

Use this article for help exporting data from Google Chrome and importing into Bitwarden.

Tip

The steps in this article can also be used with any Chromium-based browser, including Opera, Microsoft Edge (Chromium), Brave, and Vivaldi.

Export from Chrome #

You can export Google Chrome (or another Chromium-based browser) data from a desktop browser or a mobile browser:

Chrome on Desktop #

To export passwords from Chrome on your desktop:

  1. Open your browser’s settings and navigate to the password settings, for example chrome://password-manager/settings or edge://password-manager/settings.
  2. Locate Export Passwords and click Download file. You may be prompted to enter your computer’s password for authorization. For Microsoft Edge, this may be hidden behind a  menu in the Saved passwords section.
  3. Specify a location to save your export to, and verify that the format is comma-separated values (CSV).
  4. Select Save to finish exporting.

Chrome on Mobile #

To export passwords from Chrome on your mobile device:

  1. Tap the menu button and tap Password Manager.
  2. Tap Settings.
  3. Tap Export Passwords… .You may be prompted to enter your device PIN or a biometric for authorization.
  4. Specify a location to save your export to.

Import to Bitwarden #

Data must be imported to Bitwarden from the web vault or CLI. Data is encrypted locally before being sent to the server for storage.

Web App #

To import data to your vault:

  1. Log in to the web vault at https://vault.bitwarden.comhttps://vault.bitwarden.eu, or https://your.bitwarden.domain.com if self-hosting.
  2. Select Tools → Import data from the navigation:
  3. Complete the following fields from the drop down menus:
    • Import destination: Select the import destination such as your individual vault or an organizational vault that you have access to.
    • Folder or Collection: Select if you would like the imported content moved to a specific folder or organization collection that you have access to.
    • File format: Select the import file format.
  4. Select Choose File and add the file to import or copy/paste the contents of your file into the input box.

    Warning

    Importing does not check whether items in the file to import already exist in your vault. If you import multiple files or import files with items already in your vault, this will create duplicates.
  5. Select Import data to trigger the import. If you are importing a password protected .json file, enter the password into the Confirm vault import window that will appear.
  6. After successful import, delete the import source file from your computer. This will protect you in the event your computer is compromised.

Additional items such as file attachmentsSends, and trash will need to be manually uploaded to your vault.

Browser Extension #

To import data to your vault:

  1. Select the Settings tab and choose the Import items option.
  2. Complete the following fields from the drop down menus:
    1. Import destination: Select the import destination such as your individual vault or an organizational vault that you have access to.
    2. Folder or Collection: Select if you would like the imported content moved to a specific folder or organization collection that you have access to.
    3. File format: Select the import file format.
  3. Select Choose File and add the file to import or copy/paste the contents of your file into the input box.

    Warning

    Importing does not check whether items in the file to import already exist in your vault. If you import multiple files or import files with items already in your vault, this will create duplicates.
  4. Select Import Data to trigger the import. If you are importing a password protected .json file, enter the password into the Confirm Vault Import window that will appear.
  5. After successful import, delete the import source file from your computer. This will protect you in the event your computer is compromised.

Desktop App #

To import data to your vault:

  1. Select File Import data.
  2. Complete the following fields from the drop down menus:
    1. Import destination: Select the import destination such as your individual vault or an organizational vault that you have access to.
    2. Folder or Collection: Select if you would like the imported content moved to a specific folder or organization collection that you have access to.
    3. File format: Select the import file format.
  3. Select Choose File and add the file to import or copy/paste the contents of your file into the input box.

    Warning

    Importing does not check whether items in the file to import already exist in your vault. If you import multiple files or import files with items already in your vault, this will create duplicates.
  4. Select Import Data to trigger the import. If you are importing a password protected .json file, enter the password into the Confirm Vault Import window that will appear.
  5. After successful import, delete the import source file from your computer. This will protect you in the event your computer is compromised.

CLI #

To import data to your vault from the CLI, use the following command:

bw import <format> <path>

bw import requires a format (use bw import --formats to retrieve a list of formats) and a path, for example:

bw import <format> /Users/myaccount/Documents/mydata.csv

After successful import, delete the import source file from your computer. This will protect you in the event your computer is compromised.

Import troubleshooting #

File size import limitations #

Imports may be rejected for exceeding any of the following data limitations:

  • If your import has more than 7,000 items.
  • If your import has more than 2,000 folders.
  • If your import has more than 2,000 collections.
  • If your import has more than 7,000 item-folder relationships (e.g. a single item in 3 folders can be said to have 3 item-folder relationships).
  • If your import has more than 14,000 item-collection relationships (e.g. a single item in 3 collections can be said to have 3 item-collection relationships).

Import Data from Password Safe #

Use this article for help exporting data from Password Safe and importing into Bitwarden. Password Safe (V8) currently only supports exporting as .csv file. Older versions are also supported .xml.

Export from Password Safe #

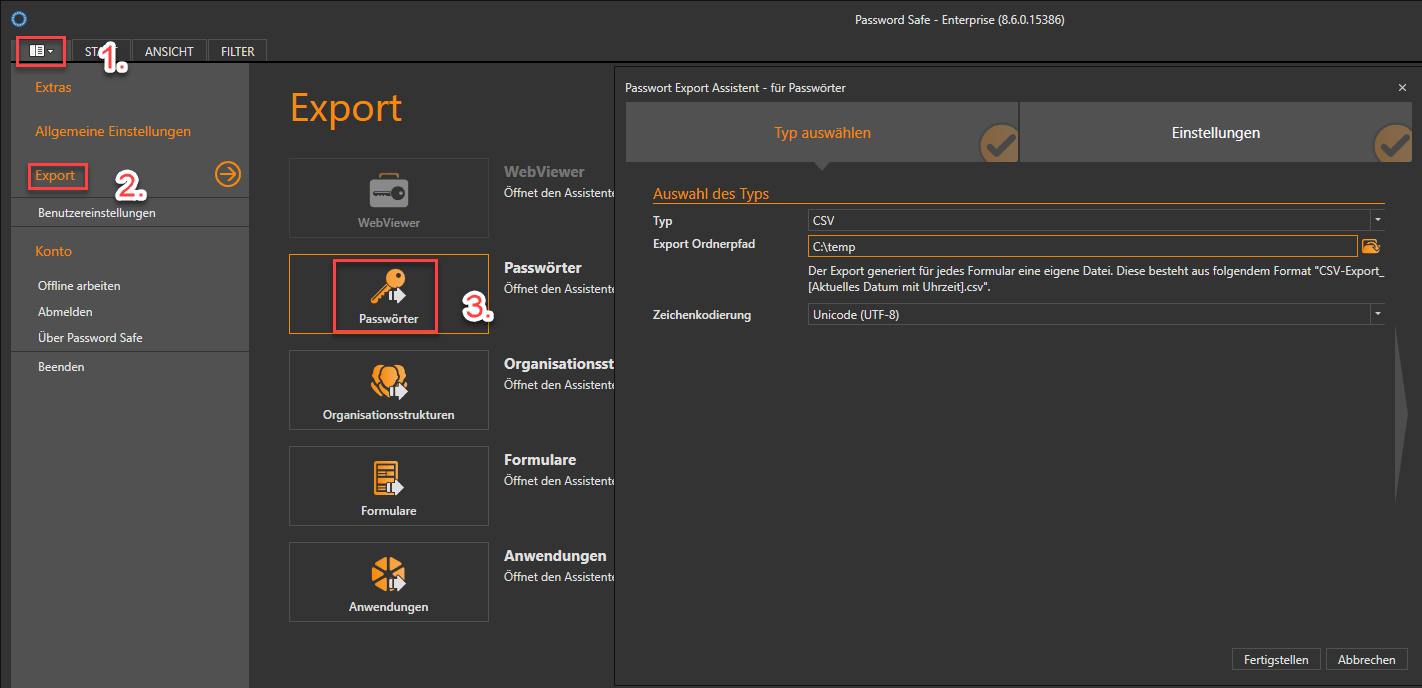
To export data from the Password Safe desktop app:

  1. Open Password Safe 8 and open the Extras menu from the upper left corner.
  2. Locate the Export option on the left-hand side and then choose Passwords.
  3. For the type please select CSV and enter a path to save the exported file. Leave the encoding at UTF-8.
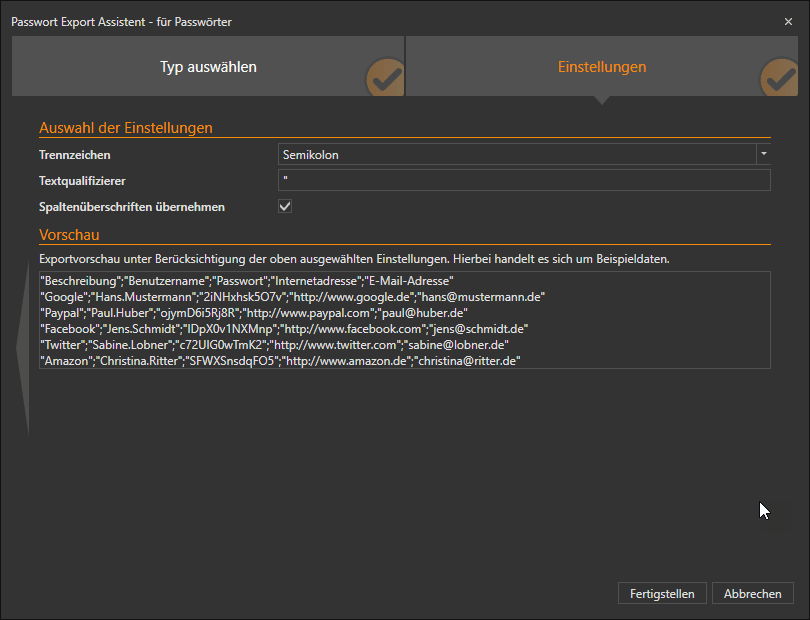
  4. Click on the big gray arrow on the right to proceed to the export settings screen.
  5. Set the separating character to Semicolon.
  6. Set the text qualifier to "(double quote).
  7. Check the checkbox to keep the column headers.
  8. Click Finish to start the export.

    Warning

    Please note that Password Safe will export a .csv for every category you have and not just a single .csv.

Prepare exported file #

Currently, Bitwarden do not offer a specific importer for this type of file. To prepare the exported file for import, please follow these instructions.

Import to Bitwarden #

Data must be imported to Bitwarden from the web vault or CLI. Data is encrypted locally before being sent to the server for storage.

Web App #

To import data to your vault:

  1. Log in to the web vault at https://vault.bitwarden.comhttps://vault.bitwarden.eu, or https://your.bitwarden.domain.com if self-hosting.
  2. Select Tools → Import data from the navigation:
  3. Complete the following fields from the drop down menus:
    • Import destination: Select the import destination such as your individual vault or an organizational vault that you have access to.
    • Folder or Collection: Select if you would like the imported content moved to a specific folder or organization collection that you have access to.
    • File format: Select the import file format.
  4. Select Choose File and add the file to import or copy/paste the contents of your file into the input box.

    Warning

    Importing does not check whether items in the file to import already exist in your vault. If you import multiple files or import files with items already in your vault, this will create duplicates.

  5. Select Import data to trigger the import. If you are importing a password protected .json file, enter the password into the Confirm vault import window that will appear.
  6. After successful import, delete the import source file from your computer. This will protect you in the event your computer is compromised.

Additional items such as file attachmentsSend, and trash will need to be manually uploaded to your vault.

Browser Extension #

To import data to your vault:

  1. Select the Settings tab and choose the Import items option.
  2. Complete the following fields from the drop down menus:
    1. Import destination: Select the import destination such as your individual vault or an organizational vault that you have access to.
    2. Folder or Collection: Select if you would like the imported content moved to a specific folder or organization collection that you have access to.
    3. File format: Select the import file format.
  3. Select Choose File and add the file to import or copy/paste the contents of your file into the input box.

    Warning

    Importing does not check whether items in the file to import already exist in your vault. If you import multiple files or import files with items already in your vault, this will create duplicates.

  4. Select Import Data to trigger the import. If you are importing a password protected .json file, enter the password into the Confirm Vault Import window that will appear.
  5. After successful import, delete the import source file from your computer. This will protect you in the event your computer is compromised.

Desktop App #

To import data to your vault:

  1. Select File Import data.
  2. Complete the following fields from the drop down menus:
    1. Import destination: Select the import destination such as your individual vault or an organizational vault that you have access to.
    2. Folder or Collection: Select if you would like the imported content moved to a specific folder or organization collection that you have access to.
    3. File format: Select the import file format.
  3. Select Choose File and add the file to import or copy/paste the contents of your file into the input box.

    Warning

    Importing does not check whether items in the file to import already exist in your vault. If you import multiple files or import files with items already in your vault, this will create duplicates.

  4. Select Import Data to trigger the import. If you are importing a password protected .json file, enter the password into the Confirm Vault Import window that will appear.
  5. After successful import, delete the import source file from your computer. This will protect you in the event your computer is compromised.

CLI #

To import data to your vault from the CLI, use the following command:

bw import <format> <path>

bw import requires a format (use bw import --formats to retrieve a list of formats) and a path, for example:

bw import <format> /Users/myaccount/Documents/mydata.csv

After successful import, delete the import source file from your computer. This will protect you in the event your computer is compromised.

Import troubleshooting #

File size import limitations #

Imports may be rejected for exceeding any of the following data limitations:

  • If your import has more than 7,000 items.
  • If your import has more than 2,000 folders.
  • If your import has more than 2,000 collections.
  • If your import has more than 7,000 item-folder relationships (e.g. a single item in 3 folders can be said to have 3 item-folder relationships).
  • If your import has more than 14,000 item-collection relationships (e.g. a single item in 3 collections can be said to have 3 item-collection relationships).
Twisted VoIP